Skip to content

Posts from the ‘Vegetables’ Category

Well, well, well… (remember me?)


This poor little blog has been neglected the last couple of months by yours truly.  Blame my new job!  I’ve been traveling like crazy and have hardly been home to cook.  So to talk you into sticking around…here’s as much of a post as I can get out there.

Let’s start with the most recent addition to our kitchen…

For my birthday, Woody gave me a baking steel, from Modernist Cuisine. Which is very cute and thoughtful…he really knows the way to my heart.  It’s through Pizza!  And a couple of nights ago…the first time, we’ve both been in town at the same time in weeks, we made one of these…

…actually we made two…and left only crumbs!

This is the closest we have come to making Neapolitan style pizzeria pizza, with a blistered crust, fresh buffalo mozzarella, San Marzano tomatoes and fresh basil.  I can’t wait to have it again!

I recently taught a 10 day course in Chico, CA and during a free afternoon, found myself touring the Sierra Nevada Brewery, which of course finishes with a tasting.  The hoppier the beer the better!  I loved the Hoptimum – it has an IBU (International Bitterness Unit) 100.  And their dry hop cold storage room smelled amazing!

Their operation is impressive, even more so because of their emphasis on being green! (Large solar array, hydrogen fuel cells, water treatment plant, etc.)  I really enjoyed Chico…quite a fun little town.  Of particular note is Chico Chai, Avocado Peach Margaritas at this place, and breakfast at Cafe Coda.

Feeling like something on the lighter side…

I experimented with a cold Soba noodle salad with seared tofu, sautéed mushrooms, steamed broccoli and fresh snow peas with a carrot, ginger miso dressing.  It needs a little tweaking, but certainly filled our bellies!

In early May, I had a craving for Chicken Tortilla Soup and whipped this up!

Those are house-fried tortilla strips on top, and the bowl is not ready until you’ve squeezed some fresh lime juice over the top and added fresh avocado as well!

Woody ordered some chile powders from New Mexico and was intrigued by this Blue Corn Pancake Mix.  We threw a batch together one morning, and can now speak from experience…it’s delicious!

Reaching way back (like late April), we made this awesome salad with roasted golden beets, fresh hazelnuts from Oregon, bacon and goat cheese!

I’m about to hit the road again tomorrow and I’ll be gone until the end of June.  I’m SOOOOO looking forward to July, summer produce at the farmer’s market, time to cook, patio sitting and a few slow weeks!

Until July…

Cheers!


DLW: Ditalini Pasta & White Beans with Garlic Rosemary Oil


I have been obsessed with white beans as of late.  No explanation…I just want them, all the time.  Also, tuna.  No idea why.

Luckily, Smitten Kitchen delivered and we whipped up this dish for dinner last week.  She mentioned that it makes enough to feed a couple starving armies…so we halved the recipe and still had plenty of leftovers for lunches during the week!

Ditalini Pasta & White Beans with Garlic Rosemary Oil

½ medium onion, cut into big chunks
½ medium carrot, in big chunks
½ celery stalk, in big chunks
3 garlic cloves, 2 left whole, 1 finely chopped
¼ cup flat-leaf parsley leaves
pinch of crushed red pepper flakes (or to taste)
¼ cup olive oil, divided
Coarse or kosh salt
1 to 2 tablespoons tomato paste
1 15-ounce can small white beans (such as Great Northern or Cannelini), rinsed
½ pound short tube pasta we used Ditalini
½ tablespoon minced fresh rosemary

Pulse onion, carrot, celery, whole garlic cloves, parsley, and red pepper flakes (to taste) in a food processor until finely chopped. Heat 4 tbsp. oil in a large, heavy pot over medium heat and add vegetable mixture to pot. (Quickly rinse, but no need to fully wash, food processor as you’ll use it again shortly.) Season generously with salt. Cook, stirring from time to time, until vegetables take on a bit of color, about 10 minutes. Add tomato paste and cook it into the vegetables for another minute. Add 1 cup water and use it to scrape up any bits stuck to the pot. Let simmer until liquid has almost disappeared, about 5 to 8 minutes.

Add beans and 2 more cups of water to the pot and simmer until the flavors meld, about another 15 minutes.

Meanwhile, cook pasta until al dente, or still a little firm inside.

Reserve 1 1/2 cups cooking water from your drained pasta.

Transfer one cup of the bean mixture to your rinsed food processor and purée it until smooth, then stir it back into the sauce to thicken it. Add drained pasta and 1/2 cup cooking liquid to bean sauce and cook the mixture together, adding more pasta cooking liquid as needed, until the sauce coats the pasta, about 1 to 2 more minutes.

To serve: Heat remaining 1/4 cup olive oil in a tiny saucepan over medium-low heat with garlic and rosemary, until sizzling stops. Divide pasta between serving bowls and drizzle garlic-rosemary oil over each.

Next time we make this, we will wait until the very end to add in most of the beans as we found that we liked them a bit toothier and less mushy.  And please, don’t underestimate how critical the garlic rosemary oil is at the end.  I would even recommend making more of the oil for leftovers and dredging some crusty bread through it.

This is a great vegetarian hearty and filling dish despite looking a little bland.  Who knows, next time I might go crazy and throw some lightly dressed arugula on top!

Spanish Pea Soup with Crispy Ham


Oh, March…you don’t really belong to winter…and yet you’re not a full-fledged spring month either.  Sigh…

I don’t know about you, but this time of year, I start craving all things spring.  Ramps, fiddleheads, greens, onions and asparagus, but there is one vegetable in particular that I look forward to the most.  Spring peas.  I think my devotion to the fresh-from-the-garden-spring-peas comes from disliking all peas that were placed in front of me before sometime in my mid-twenties…and is most likely related to the fact that 99% of those were of the frozen or canned variety.

Here’s a revelation.  This Spring Pea soup can be enjoyed any time of year.  Let me say that again, you can enjoy the delightful crisp and sweet taste of spring peas any time you feel like it.  Herein lies the genius of this Spanish Pea Soup with crispy ham and the Barefoot Contessa!  So even if it is still dumping snow in your neck of the woods…it can be springtime in your mouth!

Spanish Pea Soup with Crispy Ham

Good olive oil
½ cup chopped shallots (2 large shallots)
1 tablespoon minced garlic (3 cloves)
4 cups chicken stock, preferably homemade
2 pounds frozen peas, such as Bird’s Eye Sweet Garden
Kosher salt and freshly ground black pepper
6 thin slices Spanish Serrano ham or Italian prosciutto

In a deep (8 x 5-inch) heavy-bottomed saucepan, heat 2 tablespoons of olive oil over medium heat. Add the shallots and saute for 3 to 5 minutes, stirring occasionally, until tender and lightly browned. Add the garlic and cook for 1 more minute. Add the chicken stock, frozen peas, 2 teaspoons salt, and 1 teaspoon pepper and bring to a boil. Lower the heat and simmer for 5 minutes. Puree with an immersion blender until coarsely pureed, season to taste.

Meanwhile, preheat the oven to 425 degrees. Place the ham in a single layer on a sheet pan and roast for 5 to 8 minutes, until crisp.

Reheat the soup and serve in shallow bowls with a slice of crispy ham on top. Drizzle with a little olive oil and serve hot.

The ham is an integral part of this dish…a nice salty and crunchy complement to the sweet peas.  We opted to serve some crusty bread alongside and we couldn’t resist yet another Barefoot Contessa recipe for Garlic Roasted Cauliflower to make the dinner a bit heartier.

This is so simple, quick and fresh that it makes a perfect weeknight meal, and leftovers are wonderful, even served cold for lunch with a dollop of creme fraiche and of course the drizzle of olive oil and a sprinkling of sea salt!

What is your favorite spring craving?


Ina’s Winter Minestrone with Garlic Bruschetta


A few weeks ago, I proclaimed this soup one of the best (especially for a brothy soup) soups I’d ever put in my mouth.  I am not joking.  I almost licked the Tupperware clean a week later after I ate my 7th lunch of reheated soup.  The photos are not my finest work – straight from the iPhone as we had company over when I made it and I didn’t stop and take photos before serving.  However, the recipe was too good to just post as a ‘Dinner Last Week’ photo post.

When it comes to soup…I tend towards the creamy or puréed ones.  Also, I don’t think I’ve ever had a minestrone that I had any interest in eating again.  I actually surprised myself AND Woody when I mentioned this was one of the recipes I wanted to make first out of my latest Barefoot Contessa cookbook – Foolproof.  The mixture of pasta, white beans, spinach added at the last second, a dollop of pesto, the richness of parmesan and the butternut squash is so savory and flavorful and perfect for a winter evening…even a mild California winter evening.

I made the recipe exactly as written and the only thing I might change is to add a bit more pancetta.  I thought for sure that the leftovers would be good…but expected the pasta to be blown out from continuing to soak up liquid and the wilted spinach to turn to mush…surprisingly, it held very well.  My mouth still waters thinking about this soup…I’d be surprised if I can wait another month to make it again.

Winter Minestrone with Garlic Bruschetta

from Ina Garten’s “Foolproof Barefoot Contessa”

Good olive oil
4 ounces pancetta, ½-inch-diced
1½ cups chopped yellow onions
2 cups (½-inch) diced carrots (3 carrots)
2 cups (½-inch) diced celery (3 stalks)
2½ cups (½-inch) diced peeled butternut squash
1½ tablespoons minced garlic (4 cloves)
2 teaspoons chopped fresh thyme leaves
26 ounces canned or boxed chopped tomatoes, such as Pomi
6 to 8 cups chicken stock, preferably homemade 
1 bay leaf
Kosher salt and freshly ground black pepper
1 (15-ounce) can cannellini beans, drained and rinsed
2 cups cooked small pasta, such as tubetti (see note)
8 to 10 ounces fresh baby spinach leaves
½ cup good dry white wine
2 tablespoons store-bought pesto
Garlic Bruschetta (recipe follows)
Freshly grated Parmesan cheese, for serving

Heat 2 tablespoons of olive oil over medium heat in a large, heavy pot or Dutch oven. Add the pancetta and cook over medium-low heat for 6 to 8 minutes, stirring occasionally, until lightly browned. Add the onions, carrots, celery, squash, garlic, and thyme and cook over medium heat, stirring occasionally, for 8 to 10 minutes, until the vegetables begin to soften.

Add the tomatoes, 6 cups of the chicken stock, the bay leaf, 1 tablespoon salt, and 1 ½ teaspoons pepper to the pot. Bring to a boil, then lower the heat and simmer uncovered for 30 minutes, until the vegetables are tender.

Discard the bay leaf. Add the beans and cooked pasta and heat through. The soup should be quite thick but if it’s too thick, add more chicken stock. Just before serving, reheat the soup, add the spinach, and toss with 2 big spoons (like tossing a salad). Cook just until the leaves are wilted. Stir in the white wine and pesto. Depending on the saltiness of the chicken stock, add another teaspoon or two of salt to taste.

Serve large shallow bowls of soup with a bruschetta on top. Sprinkle with Parmesan cheese, drizzle with olive oil, and serve hot.

Garlic Bruschetta

1 baguette
Good olive oil
1 garlic clove, cut in half lengthwise
Preheat the oven to 425 degrees.

Slice the baguette at a 45-degree angle in inch-thick slices. Brush both sides of the bread with olive oil and bake for 6 minutes, until lightly toasted. Take the slices out of the oven and rub the surface of each one with the cut clove of garlic.


ps:  This recipe is all over the internet, pinterest, etc.  Apparently, I’m not the only one who thinks it is absolutely delicious.


Sous Vide Turkey Breast (or Thanksgiving…Round Two!)


We had a wonderful thanksgiving…including our four cranberry sauces…with 15 friends at 3 different houses.  The evening was wonderful and the food delectable including two different turkeys (one smoked) and incredible sides and of course dessert!  Apparently, that just wasn’t enough for us.  Since we had quite a bit of cranberry sauce left…we decided to do Round Two (downsized a bit!) on Sunday.

First…let’s give credit where credit is due…

This is our official Thanksgiving feast.  Complete with turkey, brussels sprouts, beets, green beans, salad, two gravies, mashed potatoes, sweet potatoes and yams, four cranberry sauces and of course, stuffing.  My plate looked like this…

I may have overdone it…but that is what thanksgiving is for!

Now for round two!

We purchased a (fairly) reasonably sized bone-in, skin-on turkey breast to sous vide.

We dried it off, seasoned it well with salt and pepper, placed it in a vacuum bag, added a few pats of butter and a bunch of fresh thyme, and sealed it up.

Before getting started, we turned on our thermal-immersion circulator to get it up to the temperature that we wanted – 149º F.  Once it was ready, we dropped the turkey in and set a timer for 2 hours and 30 minutes.

We were so taken by the stuffing that our friend Paul made…we just had to remake it.  I may have mentioned in the past my issue with soggy foods – and stuffing generally falls into this category…however, I had trouble resisting this one…it has green olives!  Let me repeat…it has GREEN OLIVES!  What’s not to love!  We had  no trouble finding the recipe since it was in one of the recent Bon Appétit and is all over the internet!  Since we followed the recipe exactly (making only a half batch), I won’t write out the entire recipe here…all you need to know is that it’s called Italian Mother-in-Law Dressing and is very good!

I cooked up some chard, then onions, dried out some bread, chopped some olives, toasted some pine nuts and tossed it altogether with some rosemary and thyme!

We had one lonely sweet potato on hand, so I diced it up, steamed it a bit and then added some butter and fresh thyme.

The stuffing went into a buttered casserole dish and had the final broth and egg mixture drizzled over the top before getting covered and placed into the oven.

Cleo tends to be very interested in what we’re doing in the kitchen and has become quite bold as of late and thinks this perch on the couch is just perfect for her.  I’m not sure I agree!

Apparently I did not take any photos…but we also had some mashed potatoes cooking.  Rather than mashing, we used a food mill that was handed down from my parents.  I’ll be honest, it has been a while since I have made mashed potatoes that good!  They were so smooth and of course, it doesn’t hurt that they are really just a vessel for butter, cream and salt!

Two and a half hours later, we pulled the turkey out of the water bath.

Once you open the bag, discard the thyme and remove the skin (we saved this and cooked it up a day or two later…it crisped up nicely!).  Once the breast was removed from the bone, I cut slices and drooled a bit.

We set the table and opened a lovely rosé from Frog’s Leap that we purchased on a visit in April to Napa.

And then it was time to plate it up…oh, we also had gravy…and don’t worry…all four cranberry sauces were on the table ready to be enjoyed!

The turkey was very moist, tender and flavorful.  Until we are serving more than just two of us at our house…the sous vide option is just too easy and dependable to not do.  This is definitely just the first of many sous vided turkey options!

Oh…I almost forgot.  Let’s discuss cranberry sauces!  I personally loved the chutney.  I think it has found a way into my recipe box for future thanksgivings…it is savory and a little different while still maintaining that tart flavor that you want from your cranberry sauce.

At our feast, the chutney and the raw orange relish (a Connelly family recipe) were the favorites.  The standard cranberry sauce (another Connelly family recipe – Thanks Dad!) also had its followers.   But I have to say, I know the Mama Stamberg’s recipe is beloved by many an NPR listener, but it was just not a hit.  Perhaps there were too many options!

I hope you all enjoyed an abundant Thanksgiving and were surrounded by friends and family.  Anyone else have more than one thanksgiving?


Pumpkin Stuffed with Everything Good


No…really…this is nothing more and nothing less than a small pumpkin stuffed with everything good!  As it is the first day (FINALLY) of fall weather here (actual rain is falling as I type), I will take a brief break from my tomato and corn obsession.

I am not the first to plaster this recipe on a blog…and I certainly won’t be the last.  This is surely a recipe that will span the test of time…and on the interwebs, that is not something to take lightly.  Take Pinterest for example; it is chock-full of seasonal sweets that utilize cookie dough, a popular candy bar and for good measure, some marshmallow fluff (examples found here, here and here).  Admittedly, my sweet tooth prefers understated, almost savory desserts (I’m not calling myself objective here!) and while these recipes have a purpose (bake-sales, holiday parties, novelty, etc.), our grandmothers would not recognize them from their recipe repertoire.  They are trends.  They may, in fact, even taste good…but they are not staples and certainly not classics.  I’m sure many out there disagree with me and that is fine…as I firmly believe that it takes all kinds.  This recipe is a classic for so many reasons – it is more an idea than a recipe, it is flexible, it is seasonal and does not waste any bits, it can be made up of leftovers and pantry items or each ingredient bought for its specific purpose, it is cheap and can serve a crowd.  For these reasons and many more, it has a place in my recipe box.  A quick google search will prove this true for many others.

The recipe is available all over the web, however I’ve posted it here is taken directly from Dorie Greenspan‘s book Around My French Table.  This dish epitomizes a perfect change of seasons dish…still emphasizing the freshness of squash while the filling is casserole and stuffing all wrapped into one.  Serve it with a crisp salad lightly dressed earlier in the fall or with some seared chicken sausages when a chill in the air is familiar and calls for heartier meals.

  • 1 pumpkin, about 3 pounds
  • Salt and freshly ground pepper
  • 1/4 pound stale bread, thinly sliced and cut into 1/2-inch chunks
  • 1/4 pound cheese, such as Gruyère, Emmenthal, cheddar, or a combination, cut into 1/2-inch chunks
  • 2–4 garlic cloves (to taste), split, germ removed, and coarsely chopped
  • 4 slices bacon, cooked until crisp, drained, and chopped
  • About 1/4 cup snipped fresh chives or sliced scallions
  • 1 tablespoon minced fresh thyme
  • About 1/3 cup heavy cream
  • Pinch of freshly grated nutmeg

Center a rack in the oven and preheat the oven to 350 degrees F. Line a baking sheet with a silicone baking mat or parchment.

Cut the top off of the pumpkin and scrape any seeds and strings from the lid, do the same to the inside of the pumpkin.  Once it is cleaned to your satisfaction, liberally season the inside of the pumpkin with kosher salt and pepper, you can also drizzle a little bit of olive oil in there as well, but it doesn’t absolutely need it.  Place it on the parchment on the baking sheet.

Toss all the stuffing ingredients together in a bowl (bread, cheese, garlic, onion, bacon, and herbs).  I had some kale on hand, so I chopped it up and tossed that in as well.  Season the mixtures with fresh ground pepper and some additional salt being careful not to over-salt as the cheese and bacon are already a bit salty.

Pack the mixture into the pumpkin…make sure it is filled!  We ended up with enough stuffing for an entire additional casserole dish which we buttered before adding the stuffing.

Mix the cream together with the nutmeg and of course, season with salt and pepper and then pour it over the stuffing into the pumpkin.

The cream provides the majority of the moisture for the stuffing, so don’t skimp…but your stuffing should not be swimming in the cream either.

Put the cap in place and bake the pumpkin for about 2 hours—check after 90 minutes—or until everything inside the pumpkin is bubbling and the flesh of the pumpkin is tender enough to be pierced easily with the tip of a knife.  It was so cute, I could hardly stand it!


Because the pumpkin will have exuded liquid, I like to remove the cap during the last 20 minutes or so, so that the liquid can bake away and the top of the stuffing can brown a little.

When the pumpkin is ready, carefully, very carefully—it’s heavy, hot, and wobbly—bring it to the table or transfer it to a platter that you’ll bring to the table.

I cut wedges and plated it with a lightly dressed salad the included some microgreens from Trader Joe’s.

The stuffing itself is delicious, but with a scoop of the tender pumpkin flesh, it is *literally* a perfect fall dinner.  I’ve got so many ideas of what to stuff a little pumpkin with…sausage, wild rice, apples, linguiza, chestnuts, the list is endless!  What would you stuff your pumpkin with?

It is wonderfully chilly outside now, but I need to temper my excitement for fall as the forecast is calling for 90’s next week.  Look for yet another post containing corn or tomatoes…or both.


Roasted Corn Cakes with Tomato Avocado Salsa


I know that it is now, technically, October…however, Los Angeles is not behaving that way and therefore I feel completely justified cooking like it is still seriously summer…as in triple digits!  Also…I wasn’t joking when I said we have been on a serious corn and tomato kick – and this recipe uses both!

I first stumbled on this recipe through Pinterest (you can follow @lizfisch) and then I happened to have everything in the house to whip up a batch.  The best part is that the source of the pin is easy to find.  Thanks to EzraPoundCake for posting the recipe, which actually comes from “Sara Foster’s Southern Kitchen“.  I made a few changes to the recipe from EzraPoundCake, including roasting the corn before shucking and not adding any jalapeno peppers (didn’t have any on hand…and as previously discussed…I can’t take the heat!) to the tomato salsa.

Corn Cakes

3 ears of corn, shucked and roasted
1 cup flour
½ cup cornmeal
¼ cup diced red onion
¼ cup thinly sliced basil
1 tsp. baking powder
½ tsp. baking soda
kosher salt and fresh ground black pepper
2 eggs, lightly beaten
2 tbsp. well-shaken buttermilk
2 tbsp. unsalted butter, melted
Canola oil for frying
Chopped Tomato & Avocado Salsa (recipe follows)

Preheat oven to 200 degrees F. Line a baking sheet with a brown paper bag or paper towels.
Cut the corn from the cobs into a large bowl, and scrape the stripped cobs with the back of the knife (or a spoon) to release the juices into the bowl.

I find the easiest way to do this is to set a small bowl upside down in a larger bowl and use the smaller bowl as the base for the cob.  The kernels tend to fly all over the place as you are cutting them off and you can maximize the stability of the cob while also catching the majority of the kernels.

Place 2 cups of the corn kernels into a food processor, and pulse several times, until the corn is slightly puréed but still chunky.

Scrape into the bowl with the remaining corn kernels.  Add flour, cornmeal, onion, basil, baking powder, baking soda, salt and pepper to the corn. Stir to mix.

Add the eggs, buttermilk and butter, and stir just to combine. (Do not overmix.)


Place a large skillet over medium heat. Add just enough canola oil to barely cover the bottom, and heat until sizzling hot.

One heaping tablespoon at a time, scoop the batter into the skillet. Cooking in batches of 4 to 5 to avoid overcrowding, fry the cakes 1 to 2 minutes per side, until golden brown.


Drain on the lined baking sheet, and place in the oven to keep warm while cooking the remaining corn cakes. Serve warm topped with a heap of Chopped Tomato and Avocado Salsa.

Chopped Tomato and Avocado Salsa

Makes about 2 cups

1-2 pints of cherry tomatoes, halved or quartered
1 scallion, minced and trimmed
1 tbsp. chopped fresh basil
1 tbsp. chopped fresh cilantro
1 garlic clove, minced
juice of ½ lime
1½ tsp. extra-virgin olive oil
1½ tsp. white wine vinegar
kosher or sea salt and fresh-ground black pepper
1 avocado, peeled, pitted and cubed

Place all of the ingredients (except the avocado) in a bowl, and stir to mix. Refrigerate in an airtight container until ready to serve, for up to 2 days.

Just before serving, add the avocado, and mix gently.

Once you’ve got everything ready to go, stack two corn cakes on a plate and top with salsa, garnish with more of the freshly chopped herbs, sliced scallions or minced red onion…any or all of them will do.

Anyone still hanging onto summer favorites out there?  Anyone…?  Bueller…?

Okay, I’ll make a promise…I’ll move on to fall dishes, as soon as the LA cools off a bit…I’m not asking for much…let’s say, highs in the 70’s?  Until then, I consider it summer!

Deal!


Orange Polenta Cake with Blackberries & Plums


Desserts in the summer should be delightful.  Fresh and vibrant.  I think you get a little more leeway with summer desserts…it can be an unexpected little something to try…so serious expectations.  So I say, run with it.  Try something new, be a little different and surprising!  Polenta cake fits the bill.  Think of this as somewhere in between corn bread and a citrus cake.

(Although I did not get the post up right on time, this cake was inspired by the Daring Cooks August Challenge…credit where credit is due!)

Rachael of pizzarossa was our August 2012 Daring Cook hostess and she challenged us to broaden our knowledge of cornmeal! Rachael provided us with some amazing recipes and encouraged us to hunt down other cornmeal recipes that we’d never tried before – opening our eyes to literally 100s of cuisines and 1000s of new-to-us recipes!

Original recipe can be found here at from the Bon Appetit website and is also on epicurious!

Ingredients

1 ¼ cups all-purpose flour
¾ cup medium-fine polenta or organic cornmeal (such as Bob’s Red Mill)1 1/2 teaspoons baking powder
½ teaspoon salt
1 cup plus 2 tablespoons sugar
1 cup (2 sticks) unsalted butter, room temperature
2 teaspoons (packed) finely grated orange peel
4 large eggs, room temperature
1 teaspoon vanilla extract
½ cup whole-milk greek yogurt
3 plums, sliced with pits removed
½ pint blackberries

Preparation

Position rack in center of oven and preheat to 350°F. Butter 9x5x3-inch metal loaf pan.  (I used a mini bundt pan and a quarter size loaf pan which seemed to hold all the batter.)  Dust pan with flour; tap out excess.

Whisk 1 1/4 cups flour, polenta, baking powder, and salt in medium bowl.

I used Golden Pheasant Polenta and the texture was perfect – coarse enough to notice but not so much that it ruined the texture of the cake batter!

Using electric mixer, beat sugar, butter, and orange peel in large bowl until fluffy, about 2 minutes.

Add eggs 1 at a time, beating well after each addition. Beat in vanilla. Add flour mixture in 3 additions alternately with yogurt in 2 additions, beating just until blended after each addition. Spread batter evenly in pan.Bake cake until golden and tester inserted into center comes out clean, 50 to 55 minutes (my mini pans took less time…I started them with 35 minutes and tested every few minutes after).

In the meantime, prepare the plums and blackberries so they have enough time to macerate.

Halve the plums (I used 3) and remove the pit and then slice somewhat thinly.  Add in a handful of blackberries and sprinkle with 2-3 tablespoons of sugar.

Toss gently and let sit for at least an hour.

Transfer to rack; cool in pan 15 minutes.

Run knife around cake edges to loosen. Invert cake onto rack, then invert again on rack (top side up). Cool completely. 

Cut cake crosswise into 1/2-inch-thick slices; serve with sugared plums and blackberries.

And for a little extra ummmpffff…top with whipped cream or vanilla ice cream.

{Epilogue}

This cake was delicious the next morning, sliced, toasted and spread with just a bit of butter.  I may have eaten it for a week straight this way!

Enjoy!

Fresh Corn & Parmesan Pesto with Fettucine


I don’t know about you…but, I measure my summer in corn and tomatoes.  Looking through recent photos…I’ve gone a little heavy on the corn as of late.  I was flipping through a cookbook at my parents and this recipe for Corn and Parmesan Pesto with Tagliatelle immediately caught my eye!  Fresh pasta with a fresh corn pesto topped accented with a little bacon and fresh basil just screamed SUMMER to me!  I had to make it and make it, I did.

The book is The Farm: rustic recipes for a year of incredible food by Ian Knauer, and after making this dish and drooling over the photos throughout…it is definitely on my cookbook wish-list!  He also happens to have a blog as I found out while researching a bit and I have now bookmarked this recipe (dare I try yet another buttermilk panna cotta?) as well as this one for future endeavors.

I don’t know why I had not thought of corn pesto before…but it will for sure have a place in my summer repertoire from now on!  Hmmm…I wonder what other types of pesto I could make?  Mushroom pesto…what about a zucchini and summer squash pesto…?

The recipe (courtesy of Ian Knauer) is shown below and includes a few adaptations I made…adding bacon and scallions and using store-bought fresh fettucine pasta.

Ingredients:
3 tbsp.’s plus 1/3 cup extra virgin olive oil
4 cups fresh corn kernels (cut from about 6 large ears)
1 medium onion, chopped
1 large garlic clove, minced
kosher salt and black pepper
½ cup finely grated Parmigiano-Reggiano, plus more for serving
1/3 cup pine nuts, toasted
8 ounces of tagliatelle or fettucine
5-7 strips of thick-cut bacon, cooked and crumbled
3-4 scallions, green and light green parts only, thinly sliced
¾ cup coarsely torn fresh basil leaves

  1. Heat 3 tablespoons of the oil in a large heavy skillet over medium-high heat until it shimmer.  Add the corn, onion, garlic, 1¼ teaspoons of salt, and ¾teaspoon pepper and sauté until the corn is just tender but not brown, about 4 minutes.
  2. Transfer 1½ cups of the corn kernels to a small bowl.  Scrape the remaining corn mixture into a food processor.  Add the parmesan and the toasted pine nuts.  With the machine running, add the remaining 1/3 cup olive oil and blend until the pesto is almost smooth.
  3. Cook the pasta in a large pot of heavily salted boiling water, according to package directions until al dente.  Reserve 1½ cups of the pasta-cooking water, then drain the pasta.  Return the pasta to the pot.
  4. Add the corn pesto, the reserved corn mixture and ½ cup of the basil leaves as well as the crumbled crispy bacon.
  5. Toss the pasta over medium heat until warmed through, adding the reserved pasta-cooking water to thin to the desired consistency, 2 to 3 minutes.  Season the pasta to taste with salt and pepper.
  6. Transfer the pasta to a large shallow bowl.  Sprinkle with the remaining ¼ cup basil leaves and the sliced scallions and serve with additional grated parmesan.

I doubled the recipe as I was feeding a crowd, and having leftover bacon (what a phenomenom…leftover…bacon…?) from breakfast, I couldn’t resist adding it to the dish.  I think the smoky bacon flavor countered the sweetness of the corn, the bite of the onions and the freshness of the basil really nicely.

Are you a corn purist?  Eating it straight up on the cob with melted butter and salt…or do you prefer your corn as kernels and mixed in and amongst other ingredients?

Stuffed Squash Blossoms with Shaved Baby Zucchini & Toasted Pepitas


When someone utters the words “…this is the best thing we’ve made…ever!”  ’nuff said.

Squash blossoms are available for only a short period of time in the summer and are the epitome of ‘seasonal’.  They are typically picked in the morning and brought to the farmer’s market that day and are best used within a couple of hours.  This dish is perfectly simple and refreshingly light without being short on flavor.

I spotted the original recipe on epicurious as we were walking through the farmer’s market trying to solidify our dinner plans.  Our modified recipe is shown below.

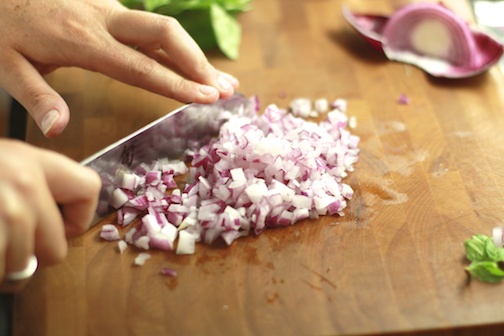
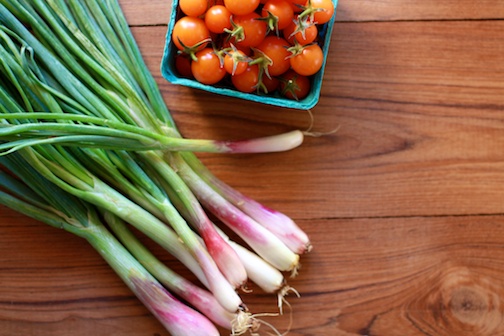
Besides squash blossoms, in looking for shallots, we stumbled upon green shallots, which I don’t believe I’ve used before.  I am positive the dish would have been delightful with regular, good ‘ole shallots…but I believe the green shallots made it just a touch more special!

Let’s talk tomatoes!  Tomatoes in the summer are serious business.  It is not summer without tomatoes that need nothing other than to be plucked from the vine and tossed in one’s mouth and with a tiny squeeze of the jaw burst forth with flavor and juice.  These miniature (sometimes referred to as Sweet 100’s) citrusy orange delights would have been so offended had we tried to cook them…they would have sprouted legs and walked right out of the kitchen (original recipe called for roasting the tomatoes).

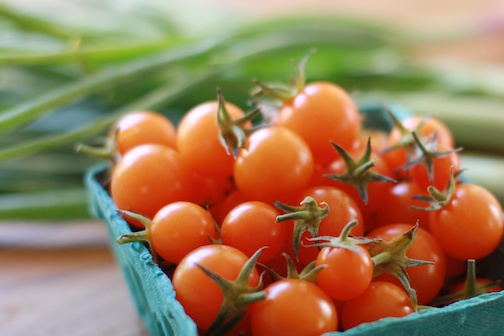
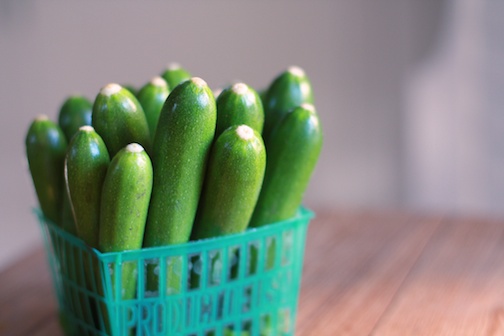
I am often made fun of for appreciating things that come in small proportions (read: I love anything that is small or comes in a miniature size).  Prime examples of such behavior: I refuse to use anything other than the mini-taster spoons when eating ice cream from a shop; we shouldn’t even talk about the number of small bowls that crowd my cupboards; and I am addicted to small notepads and mini-books and have recently discovered some half-size mechanical pencils; so my love for baby vegetables should not surprise anyone!

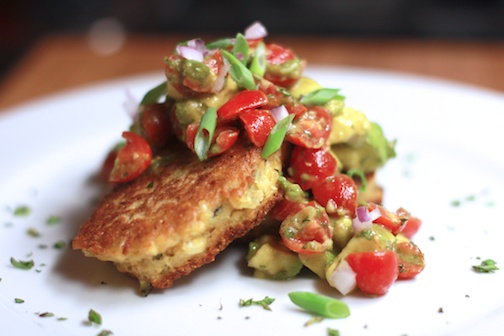
How can you resist these little guys!?!

Make sure to roast the pepitas, the nuttiness and the crunch are very important for the final dish!

For squash blossoms

2 teaspoons olive oil
1-2 oz mild fresh goat cheese (6 tablespoons) at room temperature
1 tablespoon heavy cream
2 tablespoons chopped green (hulled) pumpkin seeds (pepitas), toasted until they puff
1/4 cup chopped fresh basil
1/4 teaspoon kosher salt
1/8 teaspoon black pepper
6 male squash blossoms with stems (not with baby zucchini), stems trimmed to 1 inch

Filling:

Stir together goat cheese, cream, pumpkin seeds, basil, salt, and pepper in a bowl and set aside.

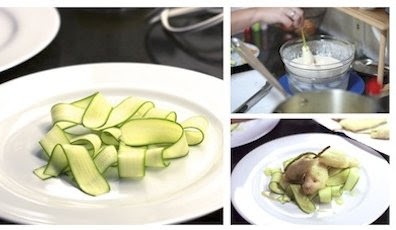
Pipe filling into each blossom and twist ends of petals gently to close.  We used a ziplock bag and cut off the tip to pipe the filling into the squash blossoms.  Chill them covered, until ready to fry.

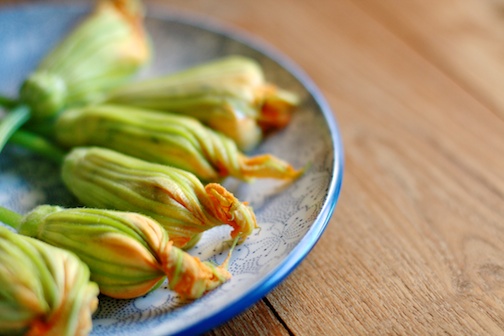
*We realized that we should have made the mixture immediately upon returning from the farmer’s market and filled the blossoms as soon as possible as the flowers were open when we bought them and closed up tighter and tighter as the day went on making it more difficult to fill them later on without ripping the delicate petals.

For vinaigrette and shaved squash

1 tablespoon rice vinegar (not seasoned)
1 tablespoon minced green shallots
2 tablespoons mild extra-virgin olive oil
1/8 teaspoon black pepper
3/4 teaspoon kosher salt
3-4 baby zucchini, rinsed and stems discarded

Purée vinegar, shallot, oil, pepper, and salt in a blender until smooth and emulsified.

Slice squash paper-thin (lengthwise) using a mandoline, then overlap squash slices decoratively on 2 plates.  Do this shortly before frying the blossoms and plating the dish, otherwise the slices will dry out.

For tempura batter and frying

6 cups vegetable oil (preferably canola or grapeseed)
1 cup all-purpose flour
1/2 teaspoon kosher salt
1 cup chilled sparkling water

Make tempura batter and fry blossoms:
Heat 2 inches of oil in a 3-quart saucepan to 350°F on thermometer.

Set a bowl in a larger bowl of ice and cold water, then whisk together flour and salt in smaller bowl. Then whisk in sparkling water until combined well.

Working in batches of 2 or 3, coat blossoms in batter, lifting each out by its stem and letting excess drip off, then fry, turning, until batter is crisp (it will not brown), 1 to 1 1/2 minutes. Transfer blossoms as fried with a slotted spoon to paper towels, drain, then season with salt.

For topping

2 tablespoons green (hulled) pumpkin seeds, toasted until they puff
Handful of small basil leaves (preferably Thai) or sliced larger leaves
1 cup small cherry tomatoes (sweeter the better), halved lengthwise or served whole 

Assemble plates:

Drizzle vinaigrette over squash slices, then arrange 3 fried blossoms in middle of each plate. Sprinkle remaining oven-dried tomatoes, pumpkin seeds, and basil around blossoms and season with salt and pepper.

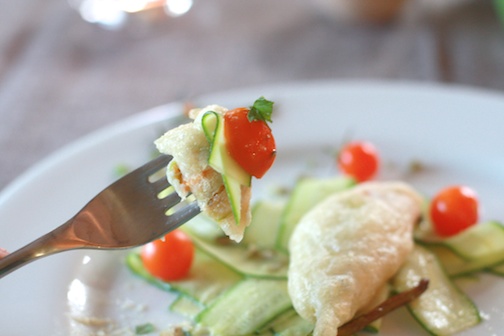
Serve immediately and enjoy with a glass of white wine – we went with a 2008 Russian River Chardonnay.

The crisp raw zucchini where perfect paired with the crunch of the tempura and the richness of the goat cheese…add in the juicy tomatoes and the acid from the vinaigrette…and it was perfection!  Seriously…perfection!

We are dying to make this again…but just might have to wait until squash blossoms are back in season next summer!

What are your favorite completely seasonal dishes for summer?